Learning

Learning

Saturday, March 5, 2016

Leather Phone Case


Phone case, leather pieces
My beloved purple phone case started dying last month and I was forced to resurrect it. Luckily I had some brown kangaroo leather on hand (a benefit of having a craft-crazy family). I used the old phone case as a template to cut out two pieces of leather, making sure to remember to add a hole for the camera.


I had originally planned to use the inside pieces of the old phone case, however it turned out that the inside was just cheap cardboard :( So I decided to cut out the pieces from an old plastic folder instead.
Cardboard inside phone


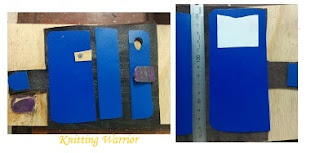
Left: Testing the placement of the magnets. Right: Double sided tape

I used a square ruler to check that the plastic pieces were evenly spaced, and then used double sided tape to keep the pieces fixed to the leather prior to stitching the phone case together. The image above shows the section of the phone case which will have a pocket (no double sided tape for the pocket).


I then used a four-pronged picking fork with a mallet to punch the holes in the leather (both sides at once) and stitched it with the saddle stitch technique.
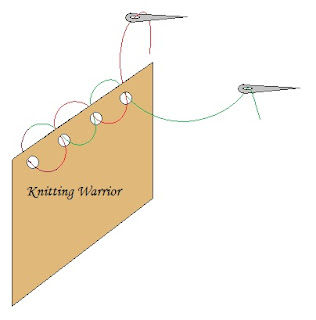


Saddle Stitch
Saddle Stitch:
Thread two needles (one at each end of the same thread). Choose your starting point and push the thread through the pre-formed hole until it is halfway through. Using one of the needles, push the thread through the next hole and pull until tight. Then take the other needle and do the same, approaching from the other side. Repeat. 

Because the leather is essentially being 'double-stitched' the resulting product is more durable than if it was sewn with a running stitch.

I used a contrasting waxed thread for my phone case, which turned out quite nicely.
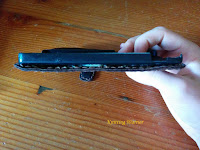


Polyurethane glue
I trimmed the leather using scissors and glued the plastic frame (from the old phone case) to the leather. I initially used an expanding polyurethane glue, however the 'foam' expanded more than I had anticipated. I trimmed off the excess with a craft knife and repaired it with superglue which did not show at all. :D I also used the knife to cut a 'pocket' into the inside of the phone case (the plastic inside stops the knife from going all the way through the case).


The middle side of the frame is left without glue.


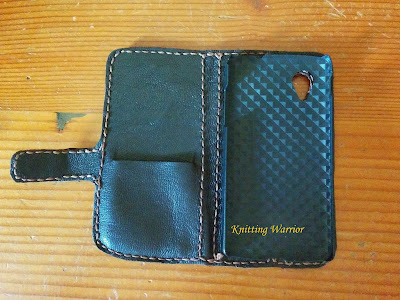
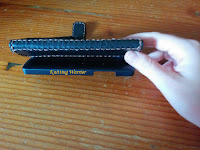
The finished product


Wednesday, January 27, 2016

Stitch Cake


A friend of mine had her birthday a while ago, and as she loves the Lilo and Stitch movie I thought I would attempt an appropriately themed birthday cake. I started off by doing a bit of research and quickly realised that the images brought up by "stitch cake" were not quite what I had in mind - mainly, that they looked way too difficult.

I decided to do a simple round chocolate cake, with chocolate butter cream icing for the base, and make it into a Stitch face by using ready made fondant. I could have used the fondant to cover the cake as well, instead of the butter cream icing, but I am not particularly fond of fondant for eating and was keen to have my cake and eat it too ;)


I designed the cake decorations on baking paper, as shown below (unfortunately this did not photograph very well). I also colour-coded each piece on the cake pattern, to determine the amount of fondant needed for each colour.

 I used food dyes to colour the white fondant, by kneading in the dye. Needless to say my hands were blue and purple for a few days afterwards :D (I would recommend wearing gloves for this stage).


I ended up with the following coloured fondants:
  • Red (mouth)
  • Pink (tongue)
  • Black (eyes, nose, inner ears)
  • Dark Blue (main body, ears)
  • Light Blue (eyes, lower jaw)
  • White (eyes, teeth)
I then shaped the fondant to the baking paper pattern pieces, using a rolling pin and knife. This worked quite well until I realised that the fondant was not easily removed from the baking paper - some tears of frustration ensued. I did manage to arrange the pieces on the cake to my eventual satisfaction, however if I used the fondant again I would put it in the fridge to harden before removing it from the baking paper.

Tuesday, January 12, 2016

Handmilled Soaps


I've been having a bit of fun with soap recently - mainly by hand milling some old Castile Soap I had lying around. Hand milling is a good way to add scents and colouring without interfering with the lye/oil/water reaction. 

The method I use involves taking premade soap (handmade or shop bought) and remelting it. The following recipe only makes about 3 normal sized soaps or about 8 small ones, but it can be doubled/quadrupled etc. to make larger batches. I suggest doing a smaller quantity first to find the right balance of ingredients before doing a larger amount.


Equipment: 
  • Heat proof container (e.g. pyrex)
  • Saucepan
  • Grater
  • Lavender Soap
  • Measuring equipment: scales, cup measure, Tbsp/tsp measures

Quantities: 
  • 4oz grated soap (by weight)
  • 3oz tap water (by weight) 
  • Added ingredient

Method: 
  1. Half fill a saucepan with water and heat until boiling. 
  2. Put the measured quantities of soap and water in the glass container, and place the container in the saucepan (double boiling). 
  3. Stir the mixture occasionally (not too often or it will form suds) until melted and well combined.
  4. Add the extra ingredient (scent or colouring) and stir through. 
  5. Pour into moulds to set. The soaps can be used once they have cooled down and are firm. 

Extra ingredients that I have tried:
  • 1/3 cup oven-toasted rolled oats, ground in a food processor (nice texture)
  • Milk powder + honey
  • 1/4 tsp ginger
  • 3 finely chopped dried apricots, soaked in water until soft
Scents: 1/3 to 1 Tbsp of finely chopped solid + few drops essential oil 
  • e.g. Leaves + essential oil (lavender, rosemary)
  • e.g. shredded coconut + essential oil


Results: 
 
Oatmeal Soap
I quite liked the oat soap, it had a very nice scratchy, exfoliating-type texture and the oats stayed nice and crisp, unlike when I added them into the pre-soap liquid.  


Milk powder and honey was also a bit of a favourite, as was the lavender. Lavender and honey have nice soothing smells, and I felt that the milk soap felt just a bit smoother - but it could be my imagination :). 


Milk and Honey Soap


Honestly the ginger was disappointing, the colour was quite nice - a subtle golden-brown fleck - but it smelt exactly the same as normal soap :(.
Ginger Soap


I quite liked the coconut - beautiful smell, nice texture (scratchy like the oats) but I received complaints from my family that they were left with clumps of shredded coconut in their hair.... I think I will try this one again, but with the coconut processed more finely. 

Rosemary was very successful, a nice garden/kitchen soap with a nice clean smell that always makes me hungry (roast anyone?). 

Rosemary Soap

Apricots also turned out quite well. I tried this on a whim because I had a bit of grated soap left over (and I'd put a lot of effort into grating it) and didn't have much hope for success. I was pleasantly surprised - it made a nice pink/orange tinged rustic soap. Because the apricots are finely diced, they don't detract from the normal texture and cleaning properties of the soap to a great extent. I did add a small amount of boric acid to this batch of the soap to preserve the apricots (even though they are dried I didn't want to take any risks). 

Apricot Soap
These little soaps make great gifts, especially when teamed with a knitted face cloth. 

Leaf face cloth (Sirdar Crofter DK) with Soaps (Bottom Right: Coconut Soap)